Bhujapidasana – Shoulder Pressure Posture
What is Bhujapidasana (Shoulder Pressure Posture)?
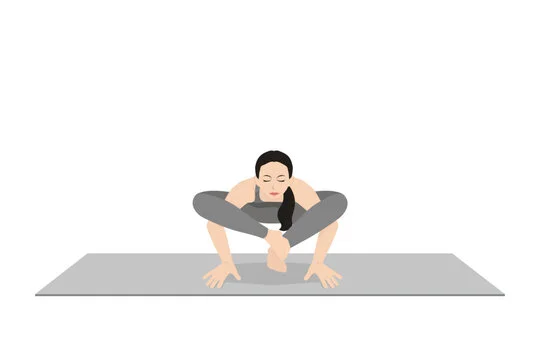
Bhujapidasana is a deep forward bend. However, looks can be very deceiving, and this Shoulder Pressure asana says it just aptly. Your body needs to have a lot of flexibility, to be able to flex the hip joints, and propel the body forward through the thighs. You will hear the asana, being referred to as the shoulder pressure posture and also the arm pressure posture. Before you start practicing this Shoulder Pressure asana, you need to build a lot of strength in the arms, shoulders, wrists, and the inner thighs, not to forget the core. This Shoulder Pressure asana or posture can improve your body balance and stability as well.
Bhujapidasana is a name that is derived from Sanskrit texts. You can break the same into three parts.
- ‘Bhuja’ means ‘arm or shoulder’.
- ‘Pida’ means ‘pressure.’
- Asana means ‘pose.’
If you do it in the correct manner, you can enjoy the benefits for the times to come. However, you have to work on your hip joints and pelvis to start with, before you even attempt this Shoulder Pressure pose. This is a challenging pose, where the groin opening is also required.
Read More: Why Is Kundalini Yoga Dangerous? The Truth About Its Risks and Rewards
How To Do The Shoulder Pressure Asana?
If you have crossed the beginner’s level, and want to grow further, then it is just apt for you to do this asana.

- You have to start with a low squat posture. Moreover, you have to keep your feet, shoulder-width apart. The knees should also be jutting out.
- You have to perform a forward fold, in which the knees have to pass between the thighs. The hands will be inside the feet, and the elbows should be touching the inside part of the knees. You have to propel your body weight forward.
- After you are settled in the above posture, you have to squeeze the shoulders underneath the thighs, while keeping your hands on the floor, on either side of the feet.
- The heels of the feet and the hands should align with one another.
- Place either of the arms against the respective inner thighs, while the hands are on the floor, for support.
- Once you have reached this junction, you have to press the shoulders onto the upper thighs, and then into the arms, and squeeze the knees in towards the shoulders. You should feel the upper back humping a bit.
- Place your weight on the palms of the hands, and lean back a bit, and then lift both the feet off the floor. You can also cross the ankles, for more exertion.
- Stay in the position, while breathing deeply and count 30 seconds.
- When you are ready to return to the former position, bend your elbows a bit, so that the feet can land on the ground.
Modifications and Variations of Shoulder Pressure
- This asana is an important part of the Ashtanga Primary series of asanas. You should start with a simpler asana, like Bakasana or the Kakasana. You can also try the Parsva Bakasana.
- It might happen, that you are not able to place your palms flat on the ground. Try placing yoga blocks underneath the hands for support. After you gain some flexibility and strength in your hands and wrist, you can place your hands flat on the floor.
There is another option, if you want to try the variation. After you move into the Adho Mukha Svanasana, you can jump, to bring the legs to interlock with the arms.
You have to inhale and exhale when you are doing the asana. Stay for 5 breaths in the lifted posture. Your gaze should be towards the front or nose or maintain Nasagra Drishti.
Safety Precautions Decoded Shoulder Pressure
When you are practicing something, as difficult as this Shoulder Pressure asana, it is important to keep a few things in mind, so that you do not get hurt.
- You have to ensure to warm up the body sufficiently, so that you do not sprain any muscle. Moreover, your hips and hamstrings should have a lot of flexibility.
- If you have some kind of issues with your wrists, shoulders, or the elbows, then you should not attempt this posture directly. Do certain preparatory poses before attempting this. Build strength and flexibility in your upper body and core muscles to be able to maintain the pose.
- To make sure that the arms do not slide off, you need to ensure that the elbows are at an angle of 90 degrees and pointing backward. This will prevent your arms from sliding off the legs.
- You also need to ensure while you are doing the asana, that the body weight is distributed evenly. You have to do the same through both hands. You can also engage in the Mula bandha to add some lift to the posture, while drawing the navel inside.
- Practicing the Shoulder Pressure asana requires a lot of patience and determination. Unless and until, you have completed all the beginner’s asanas successfully, you must not do this asana.
Who Can Do This Asana and Who Cannot?
If you have already mastered the beginner’s level, then you can try out the pose. Otherwise, you need to keep in mind the following contraindications.
- If you have had any injury or surgery in the hips, groin, wrists, shoulder, back, ankles, or the knees, you should avoid this pose.
- If you suffer from weakness of the joints, carpal tunnel syndrome, frozen shoulder, or tennis elbow, you should refrain from doing this pose.
- If you suffer from migraine, stress, anxiety attacks, or depression, you need to avoid this as well.
- If you are still learning breath-initiated poses, or asanas, then you should also avoid this pose. Since this is a breath awareness asana.
- Senior citizens, pregnant and post-partum ladies should also avoid this pose.
Read More: Everything You Need to Know About Kundalini Yoga Teacher Training
Benefits of Shoulder Pressure Posture
- This is a body balancing pose, stretches, strengthens as well as lengthens the spine.
- It also helps to increase core strength, while opening the hips and groins.
- You can improve upon the flexibility and strength enhancement of many muscle groups, that you will be engaging while doing this pose.
- Since this is a balancing yoga pose, you will develop more awareness and focus with continuous practice.
- This is a de-stressing pose, but for those who are intermediates.
- It also tends to balance the emotions and stabilizes the mind.
- It also stimulates the abdominal organs, when you engage the core.
- The pose can also enhance the sexual capacities of both men and women.
Deepen Your Yoga Practice with Hari Om Yoga Vidya School
Located in the heart of Rishikesh, Hari Om Yoga Vidya School is a place where ancient yogic wisdom meets modern teaching techniques. As a top yoga school in Rishikesh, we are committed to providing authentic, immersive yoga education in a peaceful, spiritual setting. Recognized as one of the best yoga schools in Rishikesh, we offer structured training programs designed to help you evolve in your practice, whether you are a beginner or an experienced yogi.
If you’re searching for a yoga school in Rishikesh that focuses on holistic learning, experienced teachers, and a supportive community, look no further!
Explore Our Yoga Teacher Training & Retreats
At Hari Om Yoga Vidya School, we offer a range of courses tailored for different levels of practitioners:
✅ 100-Hour Yoga Teacher Training in Rishikesh – A foundational course for those looking to begin their yoga journey.
✅ 200-Hour Yoga Teacher Training in Rishikesh – An internationally recognized certification for aspiring yoga teachers.
✅ 300-Hour Yoga Teacher Training in Rishikesh – Advanced training to deepen your practice and refine your teaching skills.
✅ 7-Day Yoga Retreat in Rishikesh – A rejuvenating escape into yoga, meditation, and self-discovery.
✅ 10-Day Yoga Retreats in Rishikesh – A transformative experience that blends yoga, relaxation, and Himalayan serenity.
Join us for a life-changing experience and become part of our global yoga family! 🌿✨


