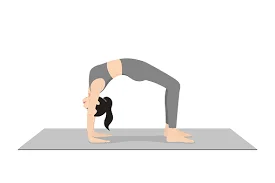
Urdwa Dhanurasana – Upward Bow Pose
The Upward Dhanurasana has multiple benefits on the human body. Upward Bow Pose has the power to strengthen your abdomen, arms, legs and also the spine. It is an intense back-bending asana, which only intermediates and advanced practitioners can do. This is a wholesome energy-boosting pose as well, which is known to open the chest and lung cavity, as well. Many yogis also call it the Chakra pose.
You can call it a gentle inversion, that stretches the body softly. The spine and abdomen areas are affected. The overall flexibility and strength of the body improves, if you practice the asana regularly. It is the part of the finishing asanas of the Ashtanga Primary series. Like all other asanas, there is a reason behind the name.

The name has come down from the Sanskrit verses, and you can break it down as follows:
- Urdwa means ‘upward’
- Danur means ‘bow’
- Asana means ‘pose’
It is one of the most important poses in the Ashtanga Primary series, as it has the power to reveal a lot of blockages. This pose requires a lot of openness and engagement. Once you find out the problem areas, you can work on them. Let us find out, how you can do the asana or pose.
How To Do The Asana?
It is not too difficult to perform the pose. However. You need a little flexibility, and the rest comes after you start doing it. You can check out the steps that are given below.
- At first, you have to lie down flat on the ground, on your back.
- Next, you have to bring your feet close to the hips. Place the feet flat on the ground. Your toes should be pointing forward.
- You should keep the feet a foot away from one another, not much. Do not turn the knees outside. You have to keep the heels right under the knees.
- In the process, your shins will be at right angles to the ground.
- Fold your hands, at the elbows, and take your hands beside the ears, on either side.
- The finger tips should be pointing towards the feet, and the palms should be pointing downwards.
- Your elbows should not jut out. They should be in alignment with the wrists.
- Inhale and slowly raise your hips off the floor, by pressing the feet into the ground.
- Rotate the shoulders as well, and lift your torso, with the help of the palm.
- Please ensure to lift the body parts, one by one. At first, you have to lift the lower back, then the middle back, and lastly the upper back.
- Stretch your back as much as possible, and lift the hips upwards.
- The knees should be in line with the feet. Both shins should be parallel to the ground.
- Extend the arms as much as possible, and also use the core.
- The gaze should be straight or in between the hands. Take deep breaths and hold the pose for 1 minute or more. You can take 3-8 breaths in between.
- After you are done, you can release yourself in the same way, as you engaged it.
- You have to bring the chin towards the chest, lower the shoulders and rest the body slowly on the floor. Lower the hips slowly and then the entire body.
You can extend the legs as well, and then relax in Savasana.
Modifications and Variations
- You can use a yoga strap around the knees. This will prevent the knees from turning outwards. Do the same with the arms.
- You can also ask your peers or the yoga instructor to get into and get out of the pose.
- You can add yoga blocks under the palm, for added height and lift.
- If you want to advance in your yoga practice, you can lift one leg straight towards the ceiling, while supporting the body with the other leg.
- If your shoulders are too tight, you should widen the gap between both hands.
- Try to place the blocks against a wall. It will help you to lift upwards at an angle of 45 degree.
You can practice the Upward bow pose in various ways. You can lift one leg as mentioned above, towards the ceiling. Apart from that, you can do it on a ball. You can also do it with the help of an aerial strap, or on a chair.
You have to engage in soft abdominal breathing. Stay for 3-8 breaths in the final folded inverted pose. Your gaze should be towards the back or in between the hands or Hastagrahe Drishti.
Safety Precautions Decoded
- You should always stretch your body, according to its limits. Overstretching in any way, can lead to immense harm.
- You cannot release the asana with a jerk, or too suddenly. You have to do it gently and smoothly.
- If you feel any sort of muscle cramp, do not repeat the asana.
- If you have stiff or tight muscles. It will make sense to do some basic warm up exercises beforehand.
Who Can Do This Upward Bow Pose and Who Cannot?
If you are a trained yoga practitioner, you can do this asana easily. However, the others must take care of these contraindications.
- If you have ever suffered from any spine injury or have undergone a surgery, you cannot do the Upward bow pose.
- If you have cardiac issues or blood pressure problems, then also you must avoid this Upward bow pose.
- If you have not been able to bring in body-breath connection, then you should not do this Upward bow pose.
- If you suffer from general weakness or Carpal Tunnel syndrome, you must avoid this asana, or pose.
- If you suffer from excess pressure inside the eyes, you must avoid this pose. Anyone who is suffering from Glaucoma must avoid it.
- Expectant mothers must avoid this pose.
Benefits of Upward Bow Pose
- This is an asana that stretches the body and also elongates it. So, it is considered for full body workout. It also lengthens the spine.
- If you practice the asana or Upward bow pose daily, your body will become extremely supple.
- It is a chest opener pose, so you will get relief from breathing issues.
- The asana or Upward bow pose requires a lot of focus for practice. So, you can do it to increase your focus and concentration.
- Upward bow pose also stimulates all the organs inside the stomach, and so they start performing at their optimal capacity.
- The Upward bow pose improves the entire body’s circulatory system.
- You can also get spiritual benefits, like energization of the chakras.
- The Wheel pose, also opens the Anahata chakra or Herat Chakra.


