Navasana – Boat Pose
Introduction of Navasana
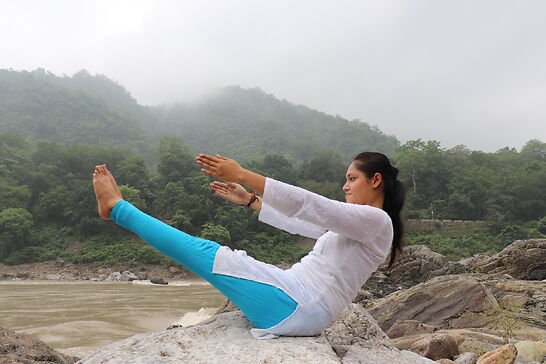
Navasana -Boat Pose (4 Times Withhold 5 Breaths Each Time) is a sitting, balancing as well as forward bending asana. With regular practice, you can strengthen your core muscles and also burn belly fat.Navasana also tones the muscles of the back and the abs. Here in Navasana, you have to simply balance the entire body weight on your tail bone and sitting bones, in the buttock. Initially, it may appear a bit challenging, but it is an extremely useful asana.
The term has come down from the Sanskrit texts, and the meaning is as given below.
Nava means ‘Boat’.
Asana means ‘Pose’.
So, that is quite clear and simple. When you perform Navasana, the body assumes the shape of a boat, and hence the name. It happens to be the eighteenth pose in the Ashtanga primary series of asanas. And, it is also the thirteenth one in seated position. The seated boat pose requires a lot of strength to hold the body in a V-shape.
Read More: Why Is Kundalini Yoga Dangerous? The Truth About Its Risks and Rewards
How To Do The Navasana?
Although it looks quite easy, the boat pose may be a bit difficult for beginners. You need to follow below steps.
- You have to sit straight on the floor, in staff pose or the Dandasana. You need to keep your spine straight.
- Now fold the legs at the knees and keep the feet flat on the ground. The knees should point upwards.
- You have to ensure to keep both the legs touching one another at the knees and the feet.
- In the next step, you have to draw your shoulders towards the back and lift your torso towards the back as well. Exhale and lift both feet off the floor, and balance the body on the tail bone and the buttock’s sitting bones.
- The shins should be parallel to the ground and the chest should be lifted a bit.
- After you have achieved the partial boat pose, you have to move forward.
- Straighten both legs slowly towards the front side, at an angle of 45 degrees roughly. The feet should be pointing towards the front, and they should be jutting out.
- You should ensure that the spine remains straight and the feet should not part much.
- Now, you ought to raise your hands up, till the shoulder level. They should remain parallel to the floor. Your fingers should point in the direction of the feet.
- Breathe normally and hold the position for 5 breaths at least.
- After the time has elapsed, you can let your hands down, and keep them by your side.
- Lower the legs slowly, with the help of your hands.
- Come to the original seated position, with the legs stretched forward.
Once you practice the pose on a regular basis, you will feel more confident.
Modifications and Variations of Navasana
To make things easy, you can use some of the modifications mentioned here.
- You can keep the legs folded in the initial days of practice, as it will help you to balance your body while strengthening the quadriceps and the hamstrings.
- If you are unable to balance the body in the beginning, you can keep both hands beside the hips, for support.
- You can also use yoga straps around the feet, and pull your torso backwards, as this will give you added confidence later on.
- You can also try placing folded blankets below your buttocks for added comfort. It will help you to get deeper into the pose. After you have mastered the pose, you can remove the blanket.
- You can also practice against a wall. But ensure not to lean on the wall, as it will be of no use. You must maintain a few inches distance from the wall for mental support.
- You have to lay more emphasis on lengthening the torso. Straightening of the legs is not a must at least initially.
Some of the most common variations include keeping boat feet grounded on the floor, while you lengthen your spine and stretch your hands ahead of you. You can also fold your knees a bit for added balance. You can also try the half-boat pose in which, you will just have to lift the shoulders from the floor, not your entire torso.
You have to inhale deeply for balance and exhale when you are bending and holding the final pose. Your Drishti should be towards the legs or Padagraye Drishti.
Safety Precautions Decoded
- You should not hump your back, while doing the Navasana. It will lead to a shift in focus from the neck region, which is one of the target areas in this asana.
- You should not be in a hurry to do this asana and rush off. The Navasana or pose is known to tighten your core muscles, so you should take time to allow them to relax before ending the practice.
- Most people think that the real star of Navasana or pose are the abdominal muscles. However, that is not true. The hip flexors are the real hero. These set of muscles help to bring your belly and thighs together.
- You should not be too worried on the outward appearance, but think about the internal parts. Your main focus should be on the floor.
- You should take the Navasana or pose lightly. The straightening of your legs is really the last thing, that you may want to do.
Who Can Do This Navasana and Who Cannot?
- If you had a recent injury or any kind of surgery in your back, hips, thigh, or abdomen, you should not perform the asana.
- If you suffer from any kind of blood pressure issues, or have migraine, you should abstain from practicing.
- You need to avoid doing this asana or pose, during the menstrual cycle.
Benefits of Navasana
- The boat pose exerts a lot of pressure on the core or abdomen muscles. Their strength and flexibility increase after you practice regularly.
- The asana is said to alleviate all the symptoms of indigestion. Moreover, it increases the metabolism as well.
- You can lose the excess fat stored in the waist region and back, by regularly practicing this asana.
- You will also be able to get rid of all your back problems, when you practice the asana regularly.
- The asana or pose is said to improve blood supply within the body. It ultimately affects the mental and physical conditions as well. So, you can also get rid of insomnia and depression.
Read More: Everything You Need to Know About Kundalini Yoga Teacher Training
Deepen Your Yoga Practice with Hari Om Yoga Vidya School
Located in the heart of Rishikesh, Hari Om Yoga Vidya School is a place where ancient yogic wisdom meets modern teaching techniques. As a top yoga school in Rishikesh, we are committed to providing authentic, immersive yoga education in a peaceful, spiritual setting. Recognized as one of the best yoga schools in Rishikesh, we offer structured training programs designed to help you evolve in your practice, whether you are a beginner or an experienced yogi.
If you’re searching for a yoga school in Rishikesh that focuses on holistic learning, experienced teachers, and a supportive community, look no further!
Explore Our Yoga Teacher Training & Retreats
At Hari Om Yoga Vidya School, we offer a range of courses tailored for different levels of practitioners:
✅ 100-Hour Yoga Teacher Training in Rishikesh – A foundational course for those looking to begin their yoga journey.
✅ 200-Hour Yoga Teacher Training in Rishikesh – An internationally recognized certification for aspiring yoga teachers.
✅ 300-Hour Yoga Teacher Training in Rishikesh – Advanced training to deepen your practice and refine your teaching skills.
✅ 7-Day Yoga Retreat in Rishikesh – A rejuvenating escape into yoga, meditation, and self-discovery.
✅ 10-Day Yoga Retreats in Rishikesh – A transformative experience that blends yoga, relaxation, and Himalayan serenity.
Join us for a life-changing experience and become part of our global yoga family! 🌿✨


